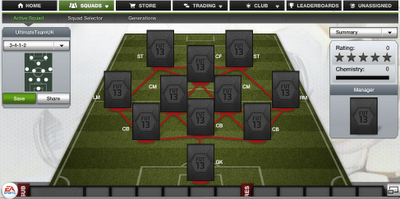
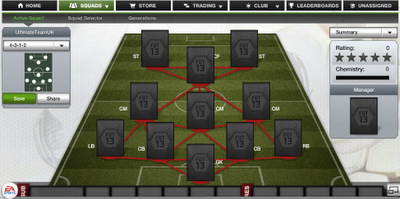
3-4-1-2Not the most popular formation, but a well balanced one nonetheless. The centre forward is key in this formation as he is the link-up man between your centre midfielders and strikers. Make sure you splash the cash on a man who can do a good job of this! You may find you're outnumbered at the back with this formation from time to time, but it should certainly help when going forward.
|
|
3-4-2-1Another formation which isn't used by many, similar to the 3-4-1-2 formation, with a change to the forward players. The left and right forwards (LF/RF) help create a wider shape in the opponents half, whilst supporting the lone striker either side. Again, with 3 at the back, you may want to make sure you have a good set of centre-backs to support your left and right midfielders (LM/RM) to stop the opponent's wide players from creating space around your own corner flags.
|

|
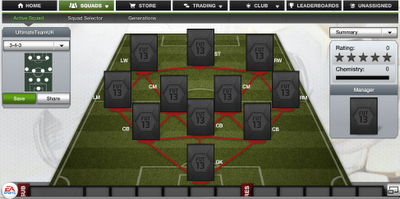
3-4-3Practically identical to the 3-4-2-1 formation, the only difference is the change of forwards to wingers. With this in mind, this formation is particularly useful to players who tend to cross the ball more often and look for space near the opponent's corner flags. It's also great for making the most of the width of the pitch, but remember, with 3 in defence it's best to pay for quality at the back.
|
|
3-5-2Slightly different midfield in this formation, with 2 CDM's there is more support for defenders. Further forward in the midfield is a CAM, this player is particularly important in this formation as it is likely that much of the play will come through him. Make sure you focus on getting someone creative who's up to the task. The left and right midfielders will need good stamina for this formation, as they will effectively be playing as wing-backs.
|

|
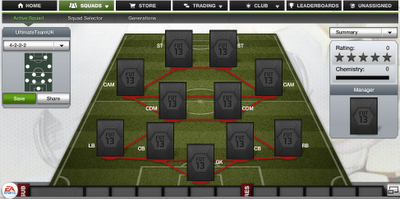
4-1-2-1-2This is one of the most popular formations on FUT and in real football. It gives a great balance between all the players, as the midfield is in a diamond shape with a CDM to anchor and a CAM to support the 2 strikers. This formation is great for those FUT users trying to use a fairly standard formation that will help both going forward and chasing back. However, it is important to note that as this is one of the more popular formations, players with this formation usually tend to cost slightly more.
|

|
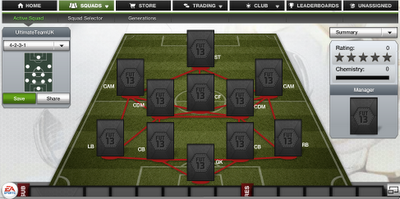
4-2-3-1Another popular formation, the 4-2-3-1 uses a lone striker with a centre forward in the hole. The interesting thing about this formation is the fact that it doesn't use any left or right midfielders or wingers, instead there are 2 CAM's either side of the midfield. Use a formation like this properly and you should dominate possession around your opponents box, but make sure you buy a striker who can finish with both feet and his head, as a lot responsibility will naturally fall on him to get you the goals.
|
|
4-3-1-2One of the more narrow formations, the 4-3-1-2 offers a good way of keeping possession through the middle. The centre forward links with all 3 midfielders and the other 2 forwards in this formation, making his task an important one. This formation is best suited to FIFA players who play the ball through the middle, either on the deck or aerial through-balls. If you prefer crossing the ball from wide positions then perhaps this isn't the formation for you.
|
|
4-2-2-2Think of this as a 4-4-2 with 2 defensive midfielders and 2 attacking midfielders. This formation shares aspects with the 4-2-3-1, but the main difference is that there are 2 strikers and no centre forward in the hole. This helps to share goal scoring responsibility between 2 strikers, but will leave the midfield less compact. The 4-2-2-2 also doesn't use left or right midfielders or wingers, there are again 2 CAM's either side of the midfield. A formation like this is probably a good idea if there are more CDM's and CAM's than CM's in your chosen league, nation or general selection of players.
|
|
4-3-2-1One of the more attacking formations, the 4-3-2-1 offers a left and right forward in support of a lone striker. Much like the 4-3-1-2, this formation also offers 3 centre midfielders, which again helps when playing the ball through the middle. Quite a particular formation and probably better suited to the more experienced FIFA players out there.
|

|
4-3-3One of my favorites, Fairly similar to the 4-3-2-1, but with the left and right wingers giving you more options out wide. From my own experience, it's best to concentrate on making sure you have a decent front 3 with this formation as they will all need to support each other and at times hold the ball up for the centre midfielders. The 4-3-3 gives a great balance between the front 6, but may take some getting used to! If you decide to go with this, allow yourself a few games to adjust.
|
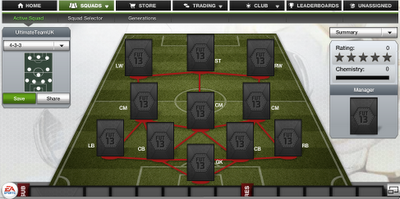
|
4-4-1-1Similar to a 4-4-2, but instead of 2 strikers, one drops back into the hole as a centre forward. Some FIFA players choose this as they prefer playing with a last-man striker and a centre forward to hold the ball up, this tactic has been proven to be successful as a number of Premier League teams have used it in recent years. This type of formation is better suited to a more pass-orientated team.
|
|
4-2-2My favorite, The standard formation for most football teams and used all over the world. The 4-4-2 offers a great balance and is probably the safest option for those users not too sure on what formation to go with. Instead of focusing on a single player for flair and creativity, the 4-4-2 basically focuses on more on the team effort.
|
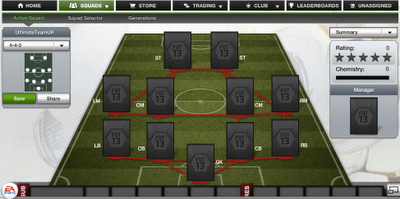
|
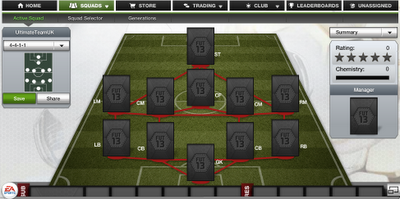
4-5-1With 5 in midfield, this formation is great for FIFA players wanting to keep possession in the middle of the park. The 2 CAM's sit behind the lone striker in support, it can be useful if your striker has the 'tries to beat defensive line' trait in a formation like this. This formation is best suited to FIFA players who prefer to build play patiently.
|

|
5-2-1-2One of the less popular formations, the 5-2-1-2 is a great way to utilise wing-backs whilst staying strong at the back. The centre forward supports the 2 strikers with 2 CM's in behind and is great for counter-attacks. It is important that your centre forward is strong and/or has good movement in a formation like this, as a lot of the play will usually come through the middle.
|

|
5-2-2-1Another formation with 5 at the back, the 5-2-2-1 is similar to the 5-2-1-2, but with 1 up top supported by a left and right forward either side. Naturally a defensive formation, also good for those players who generally rely on counter-attacks. Quick forwards can be useful in a formation like this and a target man striker can also help in holding the ball up for overlaps.
|
|
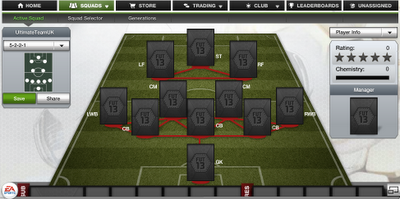
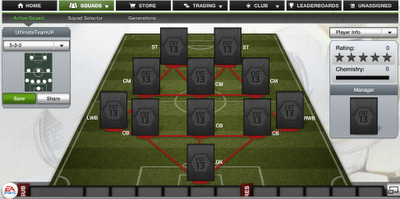
5-3-2This formation also has 5 at the back, with wing-backs controlling the flanks either side of the 3 CB's. The midfield is slightly different from the last 2 formations, pretty standard with 3 CM's, allowing 2 ST's up top. Although there is 5 at the back, if your wing-backs have a high attacking work rate, this formation can be a fairly attacking one. It is their job to create space in the wide areas and the 3 central midfielders should control the ball through the middle, providing balls to both strikers.
|
|
